


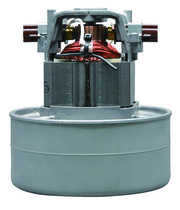
Lamb® Electric vacuum motors have been a staple in the commercial market for many years. Whether it’s for scrubbers, extractors or central vacuum systems, these motors are considered critical because of their durability and dependability.
Brushed vacuum motors have evolved thanks to cutting-edge technologies and ongoing research. Over the last 30 years, they have become smaller, lighter and faster. Additionally, there has been a significant improvement in components, with bearings now reaching 50,000 to 70,000 RPMs and fans that can take on higher speeds and last a normal lifetime.
 Brushed vacuum motors are based on a universal motor design, which uses a wound rotor and stator in a series with one another. These motors come in two forms, bypass or thru-flow:
- In bypass motors, the working air is independent from the cooling air. A separate fan is used to direct cooling air over the armature and field. They are used when it’s important to ensure that the cooling air doesn’t mix with the vacuum or blower air. Bypass motors come in peripheral and tangential discharge configurations, and are available in single or multiple stages. The purpose of the stages is to create more pressure or vacuum.
- In thru-flow motors, the working air travels through the fan system and is discharged directly over the motor windings as it exits. This allows the working air to provide the cooling air for the motor. Thru-flow motors are available in single- or two-stage, and are ideal for dry vacuum conditions since the working air also cools the motor.
Changing for the Better
One way to get the most life out of these motors is to change the brushes periodically. Below are direction for how to change the brushes on one of our Lamb® Electric 8.4” motors. Assemble the Necessary Tools:
- #20 Torx driver
- Wire cutters
- Needle nose pliers
- Crimping pliers
- Pick / hook tool
- Brush replacement kit (2 carbon brushes and 2 splices)
You might also want to have handy:
- Hi-pot tester
- Multi-meter with ohm function
- Variable power supply
Removing the Brushes
- Place the motor on a flat work surface.
- Disconnect the leads from the power source. If the motor has a filter housing, remove the screw holding the housing and set it aside for reuse.
- Remove the two screws at the top of the motor, leaving the ground screw attached to the metal cover. Set the cover aside. This will give you access to the inside of the motor and its carbon brushes.
- Use a pick or hook tool to pull the spring off the back of the brush and into the retaining slot of the bracket.
- Slide the old brush out of the slot in the bracket and gently pull it away from the motor so you can cut the copper brush shunt near the used brush. Discard the used carbon.
- Repeat steps 1 through 4 above for an additional brush.
Changing the Brushes
- Attach the new brush shunt to the old shunt using the crimp splice supplied in the kit.
- Use compressed air to remove any carbon and dirt from the inside of the motor. Make sure that the white brush insert is in place, and the brush spring is in the retaining slot in the bracket.
- Slide the new brush into place, moving the spring into the slot on the back of the brush. Be sure to reposition the brush shunt so that it does not short on the commutator or the field laminations as the brush wears. The shunt must be able to move with the brush as it wears and not get caught on any obstructions.
- Repeat this procedure for the brush on the other side of the motor.
Completing the Change
- After both brushes are replaced and the shunts are positioned correctly, replace the motor cover and the filter housing.
- Put the metal cover back on the motor with the power wires going through the rubber gaskets in the cover, being careful not to pinch the wires between the motor cover and the bracket.
- Reinstall the motor cover screws.
- Route all the wiring through the center of the filter housing and install the filter housing screw. Now that the motors are reassembled, test them with a hi-pot tester. If no tester is available, test the continuity between the leads and bracket to assure that the leads are not shorted. You’ll also want to test the ground lead to the bracket to assure that there is a good ground connection.
- Finally, to seat the carbon properly, run the motor at 50% of the rated voltage for 30 minutes. This can be done with a variable voltage supply or to connect two motors in electrical series.
The motors are ready for use in your application.
At AMETEK DFS, we understand you’re looking for more than just an off-the-shelf part or one-time solution. You need a true technology partner who understands your engineering challenge and is focused on providing you customized, collaborative solutions. We’ll also provide you with excellent customer service for a great total experience. Visit www.ametekdfs.com for more information. You can also phone +1 330-673-3452 or email dfs.information@ametek.com.


